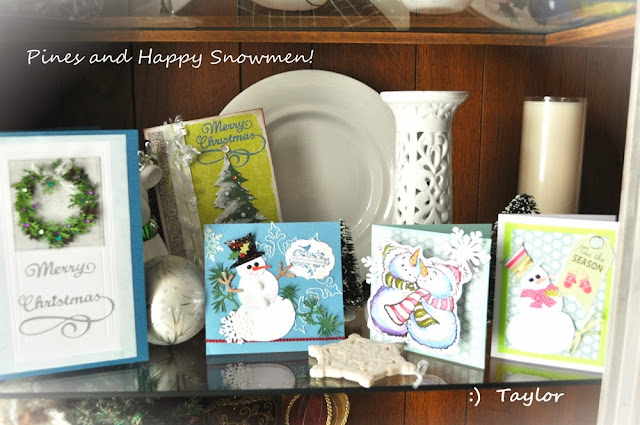
Snow much SNOWMEN - Assembled Snowman by Tim Holtz and Large Snowflake, Merry Tree by Impression Obsession
OK, thanks for stopping by to read about my card-making, hope it helps you with ideas!
If you've read my earlier holiday posts this year, you'll know I purchased:
Tim Holtz's
a) ASSEMBLED SNOWMAN Bigz Die
b) FESTIVE GREENERY Decorative Strip Die.
Martha Stewart's
c) BRANCH Punch - as in a pine branch ...surprising that it took me that long to buy this punch!!!!
You know how it is sometimes?
Impression Obsession's
d) LARGE SNOWFLAKE and
e) MERRY TREE thin Dies - awesome!
Last year's purchases:
f) a small branch punch from a company 'unknown' (found it in a discount bin)
g) SNOWMAN PAIR - the cute Stampendous Jumbo Stamp (snow much fun to colour!)
.
1) So! First up - my friend Jane's card, featuring Assembled Snowman!!!!
Again, so much fun putting the snowman together! I created several 'blanks' of the white head and body, arms {in various neutrals}, etc. and then had serious fun choosing paper for the hats and scarves!
I also purchased several embossing folders this year {not shown here} and made a few of each in different colours to act as mats. Preparation is key for me :)
Then, I sat down and reflected on each person, and customized my snowman to suit them! Jane is a happy traditionalist judging from the cards she makes - and she does a lot of detail work.
So, I put my heart and soul into this card for her!
I created her snowman with a traditional black hat. The hats - (unless they were cut from specialty paper, such as foil or velvet cardstock), were treated with MODGE PODGE Dimensional Clear Coating which is very similar to Glossy Accents. Before it dried, I would decorate it: sprinkle glitter, drop the accent pieces into place. The hat has a accent hat-band, but sometimes I opted not to use the band, and would just draw a bamboo stick threw the modge podge to create a welt - anyways, lots of ways to decorate the hat!
The snowman once glued together can be accented with a light blue marker in some places, the nose and body glittered, and he can have a banner or a 'sign' in his twig hands - I have used Stampin' Up!'s Framelit "Labels" (small size) to create my greeting which he holds up gleefully!
My special accent: pearl tear drops.
Background
At an earlier time, I treated one of the IO Large Snowflakes with glitter and set aside to dry. Now I poked out one of the large sections and considered where I'd like it to be positioned. After that was settled, and with the help of a glue pen, I was able to adhere it down to the blue card base.
Then I did the same with 2 pieces of pine branch from the FESTIVE GREENERY Decorative Strip Die [there are several components to the greenery - so choose away!]
The greeting was created in multiples {again - prep!, so handy!} and its easy to place it in the twig and adhere.
Finally, I popped on the snowman. Feeling like some 'red' was needed, I added a gem strip across near the bottom of the card front.
Ta da! She has since received it and really, really likes it - so glad! Aren't you glad when you receive positive feedback? I know it makes me happy :)
***************NEXT UP - PINE WREATH CARD! *****************
I had no clue what I was going to do with Impression Obsessions MERRY TREE Die - at first. But I knew it would be awesome on any card!
So knowing for sure that Martha's Branch Punch would help me create wreaths, I simply thought " how will I pair these two together????...hmmmm" LOL - easy - on a DOOR! Duh!
OK, making the door this size took a little time since I had no measurements in front of me. I worked it out so that the card itself would be pretty tall. Lots of people expect big cards, so this is great for that!
I created a door using white classic cardstock from Flourish, and my score board. Takes time to ease up to the perpendicular lines so that you don't "go over", so I had a tense moment 4 times or so. But its all good now.
My most fun part? Treating the window of the door with Martha Stewart's Silver ink! Yes, I sponged it on along with a tiny, tiny amount of Stampin' Up!'s Soft Sky ink and it came out so pretty. Really makes a nice backdrop for the wreath!!
Next best fun part - the wreath of course! Punch out a bunch of those suckers - and then glue, glue, glue away in a circular fashion {or square if you wish!} Anyways, I interspersed some brown branches from the 'unknown' punch, and finally added gems and a wee silver mesh ribbon - LOVE IT!!!
Attach the wreath into the " window ", and then lovingly use the glue pen again to attach a die cut of MERRY TREE from IO. I cut mine from sparkly grey-silver cardstock. I did not use the flourish that is part of the 3 pieces that comprise this die - but I can use it inside the card.
I lightly sponged another of piece of white cardstock with more SOFT SKY to form a mat between the stark white door and the blue card base.
Its a nice solemn yet pretty card for just that person you know would love it, right? Right! Cheers again!


Comments