Hey everyone!
I am deep into my crafting this morning as I had a swap project to finish, and once I was done that, I was still feelin' crafty. I took a look at some challenges posted 'round the net and found Tuesday Trigger. The challenge "Sweets for the Sweet" suits me! It's soft colours of Pink are some of my favs.
So using the same stamp I merely switched to a different project and ended up with my own CHIPBOARD HEART! I really like it!

This is the front, see - its the same pretty heart from the Stampin' Up! "Love You Much" stamp set. It has been created in several stages using the stamp, chalks, vellum, cardstock, white embossing powder and chipboard of course! It may be hard to tell from this angle, but it is fairly thick chipboard and I still need to decide what I plan to use it for.......I guess that will be another post for another day!
Today, I will show you how I made it!! This way, you can always create your own custom chipboard accents - you're not limited anymore to purchasing ones from a retailer!
Stage 1. Stamp Image onto Adhesive-backed Vellum and Cardstock, Emboss, Chalk.
I chose to stamp my image onto VELLUM using white CRAFT ink which allowed me to sprinkle White EMBOSSING POWDER on to the 'wet' image, heat to dry. Now I end up with a beautiful soft design on the pale icy vellum - like a fine lacy curtain!
However, I also want to layer it over a equally soft cardstock - a whisper of pale pink.

Meanwhile, I cut out the vellum embossed heart image and set it aside for now..
To layer the vellum over a very soft pink colour cardstock - the white ink against this paper might not "show up" very well......so, after some thought, I chose this next stage.
In order to make the white vellum heart 'pop', I need to give it a "shadow" from behind - a contrast.
If my vellum was not the 'adhesive-backed' type, I could simply chalk or ink on the back side of the vellum to make the white image stand out - but since I can't chalk or ink the sticky back side, I need to do the following .....
To do this, I stamped the same design onto the pink cardstock using a deeper PINK ink, and then using pink CHALK, I 'spotlighted' the flowers and itty bitty circles, and edges, applying the chalk with a soft applicator in circular movements. The chalk darkened a tad over the pink ink- even better!
Peeling away the backing on the vellum heart, I adhered it directly over the stamped/chalked image on the pink cardstock. Now there is a 'pink shadow' from behind - which sharpens the white heart design. See the picture above and below.

So let's summarize:
1. stamp image with craft ink onto vellum; sprinkle with embossing powder, heat to set,
2. cut out vellum-embossed heart and set aside,
3. stamp image again in a darker co-ordinating ink onto cardstock, spotlight various parts
of the image with chalk in the same colour,
4. adhere the vellum-embossed heart directly over the stamped/chalked image on the cardstock
Stage 2. Create the Chipboard Heart
First I adhered the cut-out cardstock/vellum HEART onto a piece of chipboard.
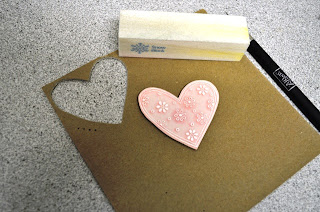
To CUT the chipboard heart out - I need to use my hobby knife and since the chipboard I am using is thick, I decide to use a wood-working technique.....trace holes around the shape, then cut with the blade following the holes. See pictures.

Here I punched holes around the edge of the heart, and then cut from hole to hole with my blade.
To make it easier to see - I created 4 holes in a larger size, see them? You would cut from one to the next hole, which you can do in one deep cut, or go over them several times till the chipboard is cut through.

The accent is cut :)
I sand the edges with my sanding tool.

This is the back side which I have also sanded lightly around the whole edge.
I can also decorate this side later if I wish. Or journal.
Well - that's it! Not hard, just a bit time consuming, but you can create co-ordinating accents to match your stamping projects.

Hope you give it a try!
Beverly
SUPPLIES All tools, inks, embossing powder, chalks, vellum, cardstock by STAMPIN' UP!
Contact Me if you have questions or wish to order these supplies.
Comments