Cute and Crafty in Fabric - Spotlighting Talent in cyberspace and Tutorial to Alter Jam Jar


 I love it when I find the darling-est things and you have to admit even if you are a non-crafty person or even, dare I say it - a minimalist in the purest sense - that these are "cutesy" period.

So check out the talent I found today while surfing....you can learn how to make these 'bottlecap pincushions' at the blog of How About Orange... and also at Craft Pudding

And then, Hawaii is one of the best places I dream of moving to (seriously I do!)....and so one of their delightful talented crafters is here at Willy Nilly Waterlily and I just love, love her
" Bashful Blooming Cactus "  - wish I could post a pix of them but you can see on her blog - the trio of them on her banner.

MY TUTORIAL TO DECORATE A JAM JAR {decorate the lid!}

In my modest manner, I have used some fabric and a Big Shot Sizzlit Die of a flower to decorate the lid of a tiny jam jar - perfect for sorting and storing my buttons.


Begin with bare jar and Here is how I altered it:

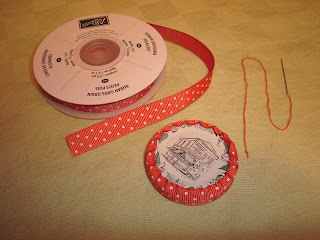
a) cut a circle of fabric slightly larger than the lid and a circle of paper  the exact diameter of the top of the lid.

 b)cut a length of ribbon to wrap around the side of the lid - baste a row of thread to pull on and draw the ribbon edges snug around the lid...use some adhesive in spots before tying a knot in your threads to secure in place.


c) next wrap the fabric circle over the paper circle, baste the edges of the fabric circle like the step above for the ribbon, and snug the two together, secure and glue to the top of the lid - hiding the edges of the ribbon.


d) to decorate the top- I used my Big Shot and a small die from my Birds & Blooms Sizzlits 4-Pack- I chose the larger single flower in  co-ordinating orange paper (use pumpkin pie, or only orange or dusty durango)
e) finally, I secured the paper flower with a smaller fabric flower and a flower brad. [see top photo]....and displayed it on my shelf!  I plan to do this to more of these tiny jars - neat way to recycle.


Well...off to surf some more! Cheers!


Aren't they something else! Darn I wish I could knit at times like these!  Hope could be on the horizon as my daughter is learning as I speak, how to crochet!


In the meantime, I will want to t

Comments

Popular posts from this blog

Fun with Tags!

That is exactly what I had with this tag.....amongst all the oodles of cards I am making for a craft fair coming up, I am taking breaks by making projects that use all kinds of different elements.  Sort of like a cardstock 'stew', lol.                                                          Cute  Gift Tag or Notecard TAG BASE  1. First, I started with a small piece of cardstock of 3 x 6 inches, folded to create a square 3 x 3 inch tag. 2.  I layered a BAJA BREEZE cardstock square on top of the tag - I used my SCALLOP TRIM CORNER PUNCH to create the pretty corners! 3. To rev it up a bit, I glittered the bottom of the tag with some of Dazzling Diamonds. TAG DECORATION 4. I stamped  my lil' WALRUS  on a punched out '1-3/4 in.' Circle  of Whisper White cardstock  - then while I "maske...

Beautiful Birthday Card from my Daughter

I was ' speechless ' on my birthday when my daughter presented me with her own hand-made card for me! Reason is that when we got up that morning we were in each other's company and yet somehow she managed to sneak off into my craft room and pull this together without me knowing it - - I was totally caught off guard, lol -- and loved it!!! She has always impressed me with her creativity because she doesn't do hand-craft items very often - she is more of an 'online creator' - I have her to thank for all my web banners and general blog technical help :) I was happy to see the cute butterfly resting on the branch, that is something I would not of thought of! Anyways, it was a lovely gesture and a thoughtful card. Beverly SUPPLIES LIST  Stampin' Up!   Eastern Bloom and Kindred Spirit stamp sets. Bella Rose  Designer Paper Pink Pirouette cardstock. 

Shabby Chic Cookie Cutter Card

Hey everyone!   Today I am blogging about the card I made in the middle of the night, lol.  It started with the idea that I wanted to use the bear from Stampin' Up!'s Cookie Cutter bundle set {stamp and punch}.  My intended recipient loves bears and I was dying to do a shabby chic style card, so voila!  Some details: I dyed a piece of white satin ribbon using ink. Ink refills {liquids} are so helpful to create co-ordinating materials for your projects. Soft sponging of paler colours help to frame your main more colourful image. Add more details by layering accents such as my poinsettias and label.   Here is one of the  embossing powders from the Stampendous Fran-tage line called ' Shabby White '. See how bubbly and glittery it is?   There it is - I love doing soft colours paired with white for pretty styled christmas cards!!!  Hope everyone is having a safe and enjoyable holiday season this year, cheers!