Hey crafters - hope you enjoyed your week-end! We are having a super hot summer day today.
Ok, my " summer season " collection of tools and supplies has grown again! Every year its my tradition to buy a punch or die with an ocean theme. I even buy the occasional stamp with the same purpose in mind, but I do tend to buy punches and dies more. I love those two tools - and if there is a matching stamp set, I'm "swimmingly" thrilled, lol!
The summer is for our fun colours, but this year I gave myself a challenge- well, two challenges. ..1) buy a die that was really over the top ' seaside' and 2) use a sleek gold card base as my starting point. The first was made easy when I saw CHEERY LYNN's Seahorse Family Die which I purchase as fast as I could from Scrapbooking Online Cafe.

The second challenge was merely because of a personal challenge - how could I use a non-traditional colour for an ocean theme? I usually delve into my bluesy, greeny colours right? Not this time mama litas!
DOLLAR STORES - right? Definitely! Moi goes there on a regular basis to scope out a find. This time it was shiny deep gold card-envelope set - 5 to the pack which is not too shabby for a dollar!
 So how to take this AND my new seahorse family dies and turn it into a " summer " card? Well I'll show ya!
This gold card is too shiny and too 'gold' for our card - so scruff it up! Use a sanding block to make bold scratches and dull areas. Using blue and green watercolour pencils trace colour into the scratches, then wipe with cloth. The effect is slight but its there and it helped to make the card base look as though it had 'natural' texture!


Ok, my " summer season " collection of tools and supplies has grown again! Every year its my tradition to buy a punch or die with an ocean theme. I even buy the occasional stamp with the same purpose in mind, but I do tend to buy punches and dies more. I love those two tools - and if there is a matching stamp set, I'm "swimmingly" thrilled, lol!
The summer is for our fun colours, but this year I gave myself a challenge- well, two challenges. ..1) buy a die that was really over the top ' seaside' and 2) use a sleek gold card base as my starting point. The first was made easy when I saw CHEERY LYNN's Seahorse Family Die which I purchase as fast as I could from Scrapbooking Online Cafe.

The second challenge was merely because of a personal challenge - how could I use a non-traditional colour for an ocean theme? I usually delve into my bluesy, greeny colours right? Not this time mama litas!
DOLLAR STORES - right? Definitely! Moi goes there on a regular basis to scope out a find. This time it was shiny deep gold card-envelope set - 5 to the pack which is not too shabby for a dollar!

Want to skip the tutorial, then to see the card, scroll down ....all the way please :)
SEAHORSE FAMILY SUMMER CARD TUTORIAL
Materials: card, scraps of colourful cardstock,
Cheery Lynn Seahorse Family and Fanciful Flourish Die,
basic scrapper's tool kit, glitter, interesting fiber, colouring supplies [ink, pencils]
This gold card is too shiny and too 'gold' for our card - so scruff it up! Use a sanding block to make bold scratches and dull areas. Using blue and green watercolour pencils trace colour into the scratches, then wipe with cloth. The effect is slight but its there and it helped to make the card base look as though it had 'natural' texture!

Using CHEERY LYNN " Seahorse Family " Die {set of 3} - cut some Seahorses using your die-cutting machine of choice in the 'colours' you desire .....I chose some bright colours ! My experience found these popped out of the dies very easily!!

Do a practice lay-out before starting to glue parts down, it helps -believe me, lol!

Now this is a multi-layered card. It's 3-dimensional effect is what makes it exciting!!
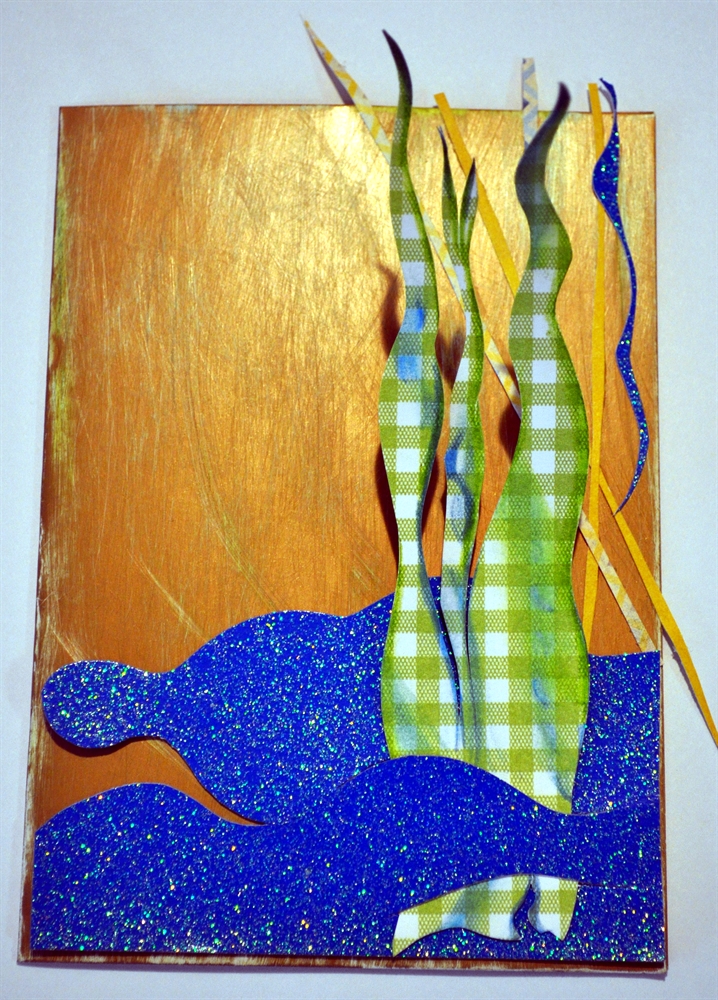
Remember- the ocean IS full of mysterious landscapes!!! To create this effect, use thin strips of scraps to make back-ground effects - glue them down at all different angles and trim excess around card's edge.

Another fun step is to make seaweed from ordinary - even, ' unexpected ' cardstock!
Obviously seaweed is not plaid, but add colour with watercolour pencils to alter the pattern.

Now make the ocean bed - a nice effect is to use a blue glitter cardstock.
To make it similiar to the design, cut the cardstock in a wavy shapes, and layer them
one over the other leaving un-glued spaces to ' insert ' seaweed.
CHEERY LYNN FANCIFUL FLOURISH DIE is one of the more popular dies
for leafy flourishes - but I found another purpose! Seahorse anchor themselves to underwater
plants. Using the flourish die, trim off the little leaves and hook one or more Seahorses onto
the remaining flourish . Tuck the flourish same as we did for the seaweed, and glue it down.

Next take some fibers and wrap card front with them. I used a small slit on the card's
fold to facilitate this, then tied it off at the front.
Using cardstock, make a mat for the card's inside. I used a chevron pattern of seaside blues
and a pinch of yellow for mine!
Here's the card front showing the seabed with the attached components, and
as a bonus embellishment, I cut some small seashells from an old macrame
plant hanger and glued them down. I glittered my seahorses with glue and dry glitter, then
added glitter accents all over using Stickles {glitter glue}. The glitter always pumps it up a notch!

Now here is a trick - the Fanciful Flourish leaves were trimmed off - you can use
those same tiny leaves to act as " FISH " ! I used some in a yellow cardstock to
mimic " goldfish " - and I even left some of the flourish stem to act as their tails!! Nifty!

FINISHED CARD!
Here it is - looking really summer-y now isn't it!
You can add a small sentiment like I have: " Chillin' " - sounds good
to me. And I think using the gold card worked out just fine, don't you?
Plus this project is perfect for using small scraps of cardstock and materials.

I sent this card out already to another nice crafty lady - hey Jane!
Thanks for dropping by!
ENJOY SUMMER EVERYONE - and spread some joy
by creating a fun card to send someone! Peace.
Comments