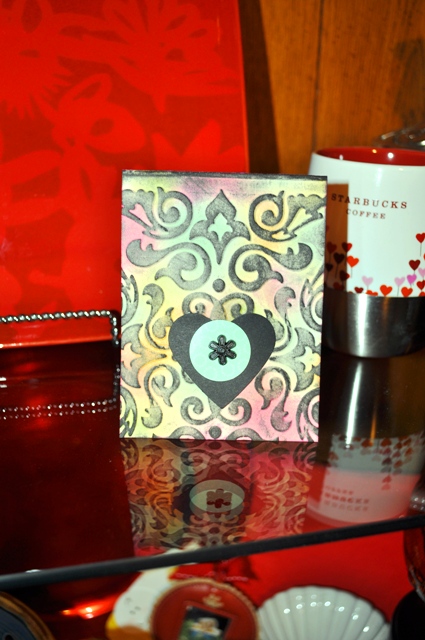
Valentine Cards - don't have to be PiNk!

No, they don't!
It's all about your own style - and here is one I made while experimenting with a technique.

I wanted to a) emboss and b) colour with embossed surfaces.

Here's what I did:
1) inked my  4 1/4 x 5 in Very Vanilla cardstock with all sorts of ink colours using sponges,
  [you can ink a larger surface area and cut it after colouring]
2) next using a damask-style embossing folder I sandwiched the inked cardstock and pressed it       through my BIG SHOT,
3) using a separate sponge to swipe black ink over the entire piece softly thus affecting only the raised surface created by the embossing folder, 
4) decorated the front with a black heart using my Heart Punch, and a blue circle with my 1 inch Circle Punch and attached them with a black flower brad.


Sorry lighting doesn't show how beautiful the colours are in contrast with the black!  Try a more dramatic valentine's card this year!  Cheers :)

Comments

Renee said…
Beverly i love this. I love all your colors with the black, just beautiful! Thank you for visiting my blog and leaving such a sweet comment. Hugz n blessings Renee

Popular posts from this blog

Fun with Tags!

That is exactly what I had with this tag.....amongst all the oodles of cards I am making for a craft fair coming up, I am taking breaks by making projects that use all kinds of different elements.  Sort of like a cardstock 'stew', lol.                                                          Cute  Gift Tag or Notecard TAG BASE  1. First, I started with a small piece of cardstock of 3 x 6 inches, folded to create a square 3 x 3 inch tag. 2.  I layered a BAJA BREEZE cardstock square on top of the tag - I used my SCALLOP TRIM CORNER PUNCH to create the pretty corners! 3. To rev it up a bit, I glittered the bottom of the tag with some of Dazzling Diamonds. TAG DECORATION 4. I stamped  my lil' WALRUS  on a punched out '1-3/4 in.' Circle  of Whisper White cardstock  - then while I "maske...

Beautiful Birthday Card from my Daughter

I was ' speechless ' on my birthday when my daughter presented me with her own hand-made card for me! Reason is that when we got up that morning we were in each other's company and yet somehow she managed to sneak off into my craft room and pull this together without me knowing it - - I was totally caught off guard, lol -- and loved it!!! She has always impressed me with her creativity because she doesn't do hand-craft items very often - she is more of an 'online creator' - I have her to thank for all my web banners and general blog technical help :) I was happy to see the cute butterfly resting on the branch, that is something I would not of thought of! Anyways, it was a lovely gesture and a thoughtful card. Beverly SUPPLIES LIST  Stampin' Up!   Eastern Bloom and Kindred Spirit stamp sets. Bella Rose  Designer Paper Pink Pirouette cardstock. 

PAPER GARDEN's MOTHER's DAY CARDS 2018

*click on photos for close-up views Welcome everyone to my blog!   As part of the Paper-Garden's 2018 Mother's Day Cards Challenge I have created a card using Paper-Garden's beautiful cardstock  and a few of my favourite dies and techniques.  To see how you can help determine the winners for the challenge, see below.  close-up  Choosing beautiful colours to celebrate Mother's Day was fairly  easy as I always love the combo of pink, green and white!   To make it more fabulous, Paper-Garden's soft shimmering cardstock  really adds that lovely quality you'd want in a card for your Mom!  Look for their Curious Metallics cardstock. The white base of  my card is their sturdy cover weight in Ice Silver. I am a real fan now! I chose to use my Fantasy Floral 3D Die Set from Altenew , and my  Large Lace Faerie Queen (butterfly) die.  I wanted the title MOM to be simple and in s...